Arduino Powered Foosball Table

wpid-foosball005-2013-04-15-23-11.jpg  + wpid-foosball008-2013-04-15-23-11.jpg  = Screen Shot 2013-04-15 at 11.57.54 PM

Why Attach an Arduino to a Foosball Table?

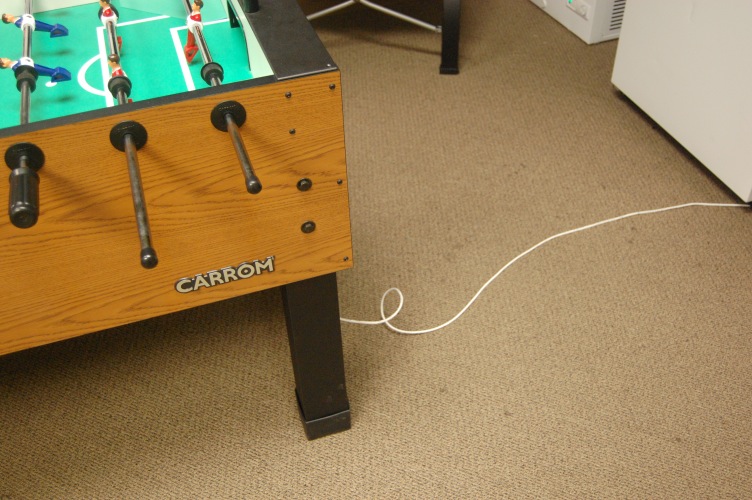
– Because the foosball table is clear on the opposite side of the building.

– Because we can!

What are those parts?

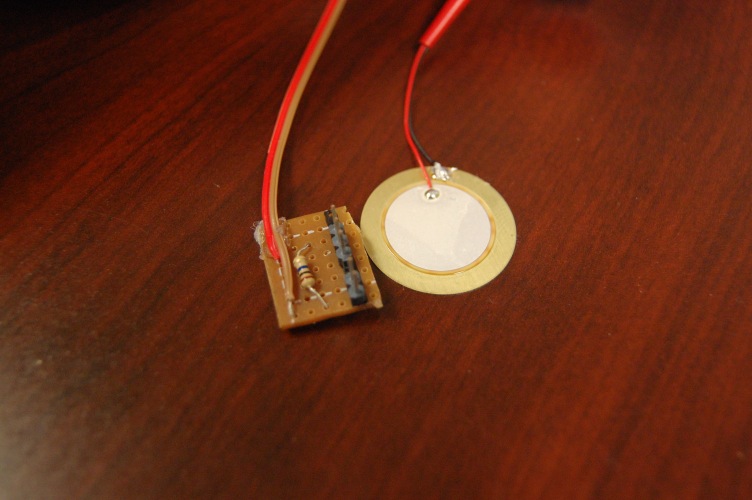
– The gold disk is a piezo electric transducer, commonly known as an electric guitar pickup. It converts vibrations into electricity.

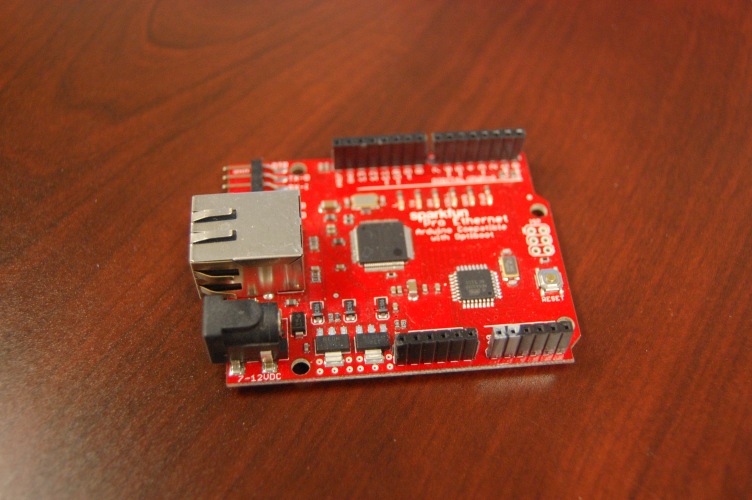
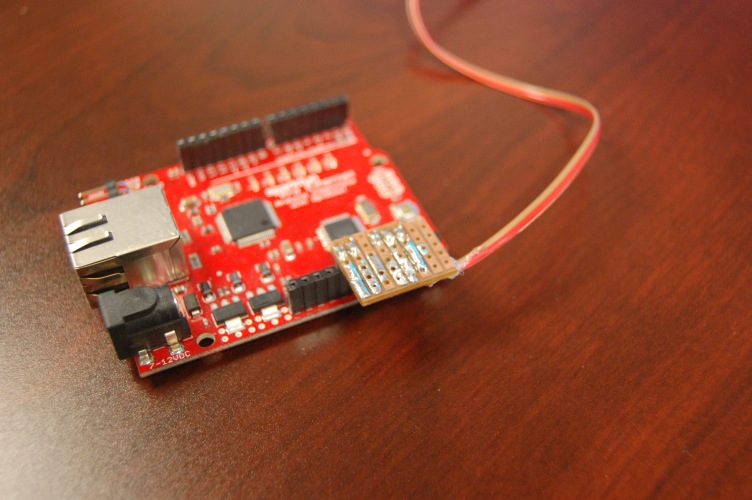
– The red circuit board is an Arduino with Ethernet. It uses the standard Arduino library to handle dhcp requests.

– The circuit board is soldered after the knock sensor tutorial on arduino.cc http://www.arduino.cc/en/Tutorial/KnockSensor

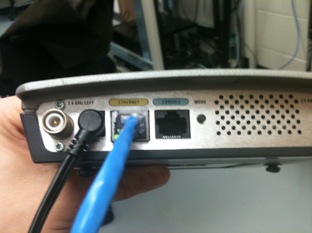
– They grey cables are Power Over Ethernet Injectors (POE). They are not required if your foosball table is in reach of a power outlet.

Where can I buy this stuff?

Arduino – http://arduino.cc/en/Main/ArduinoBoardEthernet

POE Cable – https://www.sparkfun.com/products/10759

Piezo Transducer – http://amzn.to/XDxBiT

1 Mega Ohm Resistor – Radio Shack

Circuit board – http://amzn.to/XDxHqM

Headers – https://www.sparkfun.com/products/116

Wire – Your local garbage can

How do I code it?

See the code on github.com/spudstud/Foosball . You will need an account on cosm.com to store your sensor readings. Replace the “Feed ID” with your feed Id, and the “Data-stream” with your data stream name.

You will need to generate a new Private API Key and replace the API key in the code with your own API key.

Cosm.com documents how to get code from an arduino to their servers here: https://cosm.com/support/examples and here: http://arduino.cc/en/Tutorial/PachubeClient

The webpage uses jquery and the cosm javascript library. You can find examples of how to use it in the “Sandbox” directory in github https://github.com/spudstud/Foosball/tree/master/sandbox

The Cosm javascript library is documented here: http://cosm.github.io/cosm-js/ Cosm developers are very active on stackoverflow.com

Once you have the webpage how you want it. You will need to create an ubuntu virtual machine and install apache to host the website. It does not need to be on the same network as your sensor.

I highly recommend setting up your ubuntu web server using vagrant.  http://docs.vagrantup.com/v2/getting-started/index.html

How did you make the webpage so pretty?

The majority of the webpage was coded by a friend who does web development professionally.

The github and “i” icons are actually fonts, not images. http://bit.ly/1190Sjj

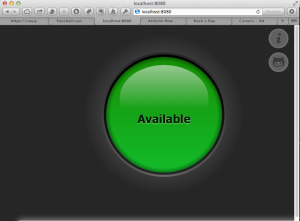
The green button is made entirely with css3 and gradients.

The graph is made with cosm’s graph builder http://bit.ly/1181kRM

Only the flat piezo elements work, speakers pulled from computer cases absolutely do not work. http://bit.ly/XOkrSu

What If I want to make my own awesome foosball table, but I have questions?

Leave a comment below

Ask your question on stack overflow and tag “cosm”

Go to the Arduino Forums

Any problems you discovered on the way?

I was going to use a raspberry Pi, but they don’t have analog sensors. Lady Ada has a great article of how to work around this: http://bit.ly/VHTEmS

Arduino Ethernet has 5 analog pins, but pins 4 and 5 are used by the ethernet shield. Pins 0 and 1 are also shared and shouldn’t be used.

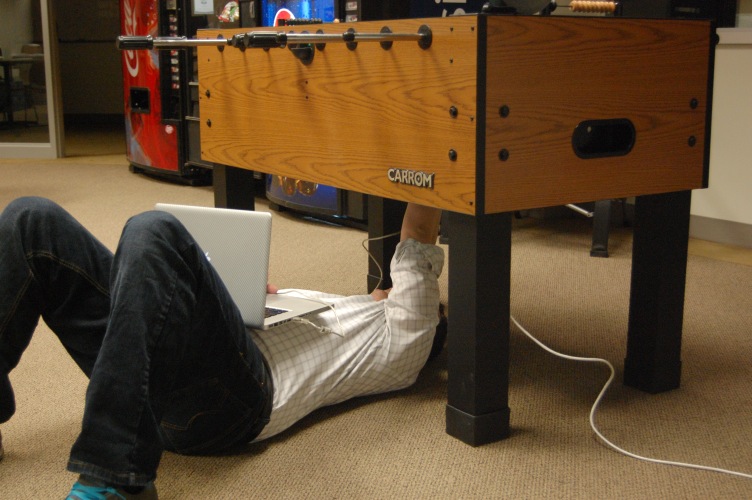
What if I want to see pictures and a video of the table?

Here you are!

wpid-foosball009-2013-04-15-23-11.jpg

wpid-foosball002-2013-04-15-23-11.jpg

wpid-foosball003-2013-04-15-23-11.jpg

wpid-foosball004-2013-04-15-23-11.jpg

wpid-foosball006-2013-04-15-23-11.jpg

wpid-foosball007-2013-04-15-23-11.jpg

available unavailable

Youtube

http://youtu.be/hi32JtDzm6I


Ubuntu 12.04 Networking on fresh install

Whenever I setup a new ubuntu install, networking never seems to work out of the box. Here are the steps to get it working

Press Alt + F2 and type in ‘Terminal’

nano /etc/network/interfaces

Edit the line that says

iface eth0 inet manual

replace the word manual with dhcp. It should look like this

iface eth0 inet dhcp

Save the file and exit nano

Enter the following commands one at a time

sudo ifdown eth0

sudo ifup eth0

sudo service networking stop

sudo service networking start

You can then test your connection is working by entering

ping -c3 8.8.8.8

If you got a reply then internet is working. Go through all the steps again and double check they were entered correctly. If all else fails, restart the computer.

So people new to linux might wonder what all those commands were.

Basically you edited a file that sets the ethernet port to get an ip address from a dhcp server instead of assigning itself one. Then you turned off the ethernet port and turned it back on. Finally you restarted the program that manages the connection to the internet.

Configure Growl Notifications on PfSense

        wpid-pfsense_logo-2012-02-9-23-595.jpg

PfSense firewall has a little known feature that allows it to send alerts to a Mac running Growl. The advantage of this is instant alerts on your personal desktop to issues that need to be resolved.

wpid-growlhelperapp-2012-02-9-23-595.png

To setup Growl Notifications go to :

System > Advanced > Notifications

wpid-googlechrome-2012-02-9-23-593.png

You will need to enter the ip address of the computer with growl running. In my tests using the Alias of my personal mac resulted in failure of the growl message to arrive. You must type in the actual ip address. I’d recommend creating a static entry in the firewall to prevent having to change this setting if the dhcp server ever happens to hand out a different address.

Create a unique password in the password field. You will also need to enter the same password on your mac under growl preferences, to prevent unauthorized users from snooping in on growl notifications.

On the Mac side you will need to open system preferences and enable growl to listen on the network.

Check “Listen for incoming notifications”

Check “Allow remote application registration”

Enter the same password you setup in pfsense growl configuration. I highly recommend that this not be a password used anywhere else on your network. Since you only have to enter it once, make it as secure as you can.

wpid-growl-2012-02-9-23-593.png

For Growl to work you must have ports 23052 and 9887 open. Lion’s built in firewall does not let you specify individual ports. It must be turned off.

wpid-securityprivacy-2012-02-9-23-592.png

To test that the configuration worked, open the command line of pfsense or simply go to Diagnostics > Command

wpid-googlechrome2-2012-02-9-23-593.png

Type in the command in the php test field (Notice the screen shot mistakenly shows the “shell” field)

file_notice(“test”,”Test notification”);

wpid-1____googlechrome-2012-02-9-23-593.png

If everything is set up correctly, you should get a growl alert on your mac.

wpid-1____growlhelperapp-2012-02-9-23-593.png

If you didn’t get this message, make sure that you have the correct ip address of your Mac entered in the configuration of pfsense’s growl page. Also make sure that the dhcp is not reassigning you a new address. Verify that the firewall is not enabled on your mac,

These instructions were created using pfsense 2.0 and growl 2.0.

Simulate Network Users

We will be covering how to test internal network bandwidth.

Researching this topic, we discovered that there are numerous programs written to test the bandwidth of a network. Trying to use any of them is like trying to give yourself a haircut, it sounds great in theory, but people make fun of you for trying.

For this we will be using a Debian based operating system. Specifically Ubuntu 10.04 LTS. You could use a RedHat based system such as Fedora, or even Mac Os X (in theory), but those will not be covered in this tutorial.

If you are using one of those alternate systems, consult online forms for support. While substituting apt-get commands with yum or mac ports

Step 1: Update apt-get repository

<code>

        sudo apt-get update

</code>

wpid-vmwarefusion-2012-01-12-16-445.png

Step 2: Install iperf from the app repository

<code>

        sudo apt-get install iperf

</code>

wpid-1____vmwarefusion-2012-01-12-16-445.png

It should only take a few minutes depending on your internet speed.

At this point, iperf should now be installed, assuming you did not receive any errors.

From here you can run iperf from the command line by typing in

<code>

        iperf

</code>

Add on any arguments that you want.

We don’t really want to take the time to learn what all the arguments are since we can use a nice pretty gui. There are times when it is great to be elite and do everything from the keyboard. If that is the case, then you are done, otherwise we will install the fantastic gui tool to make a lot of these options much simpler.

For this part we will need to check out a version of the latest code from google code. To do that we will need to first have svn (subversion) installed. What subversion is; for those new to coding, is a way to keep track of versions of code. Frequently it is called ‘versioning’.

If you are curious research

git

github.com

svn

bitbucket.com

mercurial

beanstalk.com

googlecode.com

Step 3: Install svn

<code>

        sudo apt-get install subversion

</code>

wpid-2____vmwarefusion-2012-01-12-16-445.png

Step 4: Install Java runtime and Java development

This will get both the runtime (jdk) and development runtime (ire). If you don’t know what that means, don’t worry about it. Just run the following command.

<code>

        sudo add-apt-repository ppa:sun-java-community-team/sun-java6        

        sudo apt-get update

        sudo apt-get install sun-java6-jdk sun-java6-jre

</code>

wpid-3____vmwarefusion-2012-01-12-16-445.png

This is the longest part of the entire process. Java is a big download.

Select OK on any prompt’s that appear

wpid-4____vmwarefusion-2012-01-12-16-445.png

Step 5: Checkout iperf gui

Change into a suitable directory first. I chose to put it in my Downloads folder

<code>

        cd ~/Downloads

        svn co https://iperf.svn.sourceforge.net/svnroot/iperf/jperf/trunk

</code>

wpid-5____vmwarefusion-2012-01-12-16-445.png

You could also navigate to the website with a browser and download it manually, but doing a svn checkout is much quicker and easier.

http://code.google.com/p/xjperf/downloads

Step 6: Change permissions

Change into the newly created trunk directory

<code>

        cd trunk

</code>

Opening the README.txt file will tell us one last step that we need to take before we can compile and install the java gui.

Open the README.txt file by either opening it from the File Browser

wpid-6____vmwarefusion-2012-01-12-16-445.png

If you don’t want to use the gui, use the cat command to show the text right from the terminal. Otherwise skip to the next step.

<code>

        cat README.txt

</code>

wpid-7____vmwarefusion-2012-01-12-16-445.png

Step 7: Set jperf.sh permisions

Change into the directory where jperf.sh is located. Mine is in Downloads/trunk/release/iperf-generic

<code>

        cd ~/Downloads

        cd trunk

        cd release

        cd jperf-generic

</code>

(These commands are separated on purpose for those new to linux)

Doing a list of all items in directory should reveal a

bin, jperf.bat, jperf.sh and lib

files and folders

<code>

        ls

</code>

wpid-macjournal-2012-01-12-16-445.png

Change the permission as indicated in the README.txt

<code>

        sudo chmod u+x jperf.sh

</code>

wpid-8____vmwarefusion-2012-01-12-16-445.png

Step 8: Install ANT

We must now install ant

Change into the utilities directory. I did it by typing in these commands.

<code>

        cd ~/Downloads

        cd trunk

        cd utilies

</code>

Now install ant

<code>

        sudo apt-get install ant

</code>

Run ant

<code>

        sudo ant release

</code>

wpid-9____vmwarefusion-2012-01-12-16-445.png

If you get an error; build.xml does not exist, the reason is that you are not in the correct directory when you are running the ant command or you did not use subversion to download the file.

In either case, don’t worry about the error too much, as it appears that it can be skipped on certain machines with no ill effects.


wpid-1____macjournal-2012-01-12-16-445.png

Step 9: Run the configuration

Now we will run a script (thats what the .js is for) to prepare the system for installation. The ant procedure in the previous step created a new folder called jperf-2.0.1 inside the release folder

Change into the …trunk/release/iperf-2.0.2 directory and change the execute permission of the jperf.sh file

You will know that you changed the permission if the file is highlighted in green after the change.

before

wpid-littlesnapper-2012-01-12-16-44.png

<code>

        cd ~/Downloads

        cd trunk

        cd release

        cd jperf-2.0.2


        sudo chmod +x jperf.sh

</code>

after

wpid-1____littlesnapper-2012-01-12-16-44.png

Execute the program

<code>

        ./jperf.sh

</code>

Step 10: Compile and run the jperf.jar file

Whew, it may seem like this is a lot of work, but the results are well worth it. Now we are going to compile a java program then execute it.

Assuming you are still in the jperf-2.0.2 folder run this command

<code>

        javac jperf-2.0.2

</code>

Reset Cisco 1200 AP

1. Assign computer static ip in same subnet as 10.0.0.x with /8 subnet mask (255.0.0.0.0)

        wpid-systempreferences-2011-10-21-11-3714.png

2. Connect Crossover Cable to Ethernet Port on AP

        wpid-img_0216-2011-10-21-11-3714.jpg

3. Connect Power to AP – Allow 30 seconds to boot up You will have either 1 or 3 green lights

wpid-img_0218-2011-10-21-11-3714.jpg

4 You are now going to continuously hold the ‘Mode’ button down for 30 seconds while performing these other tasks:

        - 10 seconds with power

        - 10 seconds without power

        - 10 seconds with power

        - As you connect and disconnect the power with one hand, Make sure to always keep the ‘Mode’ button pressed down with your other hand

5. Wait until the lights change or about 10 to 15 seconds, then let go of ‘Mod

6. Navigate to 10.0.0.1

wpid-googlechrome-2011-10-21-11-3714.png

Username = Cisco

Password = Cisco

wpid-googlechrome1-2011-10-21-11-377.png

If these steps didn’t work

  1. Power cycle the device, then give it up to 1 minute to start up and try webpage again
  2. Verify you are using a cross-over cable and that the cable is good
  3. Make sure all other network interfaces are turned off on your laptop / desktop, especially wireless. Ensure your computer is not connected to the internet.
  4. Restart your browser if you have changed the state of any network interface cards on your computer. Some browsers tie all traffic to active interface on startup.
  5. Perform reset sequence again waiting 20 seconds between each step.

Standard vs. Extended Access Lists (ACL)

There are 2 kinds of ACL’s

Standard & Extended

Standard lists are implemented by the destination

Extended lists are implemented by the source

To see your current access lists type:

Router(config)# show access list

Standard


Extended

First you must create an access list by giving it a name. I am calling this access list 101. Remember you can have 1 access list per port, per protocol, per direction.

ip access-group 101 in
ip access-group 102 out
ip access 101 permit protocol source ip wildcardmask destination ip wildcardmask *port

*= optional ; protocol options (ip, tcp,udp, icmp)

(Here are some more examples)

ip access 101 deny tcp 192.168.0.1 0.0.0.255 192.168.2.0 0.0.0.255
// wildcards are opposite subnet masks
        (this example would stop any computer that starts with 192.168.0.x from sending an ip packet to any device with 192.168.2.x)

ip access 101 deny icmp 10.1.2.3 0.0.255.255 172.16.5.1 0.0.0.255
        (this example would stop any computer that starts with 10.1.x.x from sending an ip packet to any device with 172.16.5.x)
ip access 101 deny udp 10.1.2.3 0.0.255.255 172.16.5.1 0.0.0.255
        (this example would stop any computer that starts with 10.1.x.x from sending an ip packet to any device with 172.16.5.x)

ip access 101 deny ip 10.1.2.3 0.0.255.255 172.16.5.1 0.0.0.255
        (this example would stop any computer that starts with 10.1.x.x from sending an ip packet to any device with 172.16.5.x)


Terabytes of network storage

There are a dozen different ways to share the terabytes of data you have acquired over the years. Some of the more popular include NAS’es (NASi? NASen? NASouses?), Drobos or just shoving dozen drives into your main desktop. I have long been attracted to drobo for their simplicity and elegance, but find that they are just too much money for a poor student like myself. There are other alternatives like Windows Home Server, UnRaid, OpenSolaris, Terastation, Nexenta, FreeNas, Openfiler , Ubuntu but I frequently start pulling out my hair every time I sit down to try and build one because there are too many options and each have their own pitfalls. One particular homebuilt nas that I particularly love is the black dwarf. I wrote a blurb about it here. The interesting part is that he is using plain old windows 7 as the host operating system. I would like to go a little more elaborate than that. I am leaning towards FreeNas or OpenFiler, but just can’t decide how to take the plunge.

        I came across a blog post at frankleng.me that takes you step by step through the process of building a FreeNas, most importantly using the ZFS file system. In case you didn’t know, ZFS is an open source alternative to FAT32, NTFS, and similar formats you might be used to.

When I get back to rexburg my plan is to start building a free nas using parts that I already have laying around. The goal is to spend less than $75 in additional parts, to create a SFTP, AFP, Samba network shares. Most importantly the box must be able to be backed up to an online service like CrashPlan, must transparently take several drives and make them appear as a single Drive, and it must be upgradeable with new drives in the future.

Please post your comments on what has and hasn’t worked for you.

Resources:

FreeNas
http://www.youtube.com/watch?v=16v4jNYH0GI
http://www.youtube.com/watch?v=mgJNzyTSv6c
http://www.maximumpc.com/article/howtos/how_to_build_a_nas_box
http://www.maximumpc.com/article/features/cheap_and_nasty_how_build_open_source_server

UnRaid
http://www.youtube.com/watch?v=nypnusWsF7A&feature=related

Windows Home Server
http://www.maximumpc.com/article/features/master_your_digital_domain?page=0%2C0

Overview
http://frankleng.me/2010/05/01/zfs-powered-nas-the-ultimate-alternative-to-drobo-droboshare-the-complete-guide/

Ubuntu
http://www.kremalicious.com/2008/06/ubuntu-as-mac-file-server-and-time-machine-volume/